
Tuesday, March 27, 2018
Smiles
I saw a post by Gabby Gellenthin and her great idea to use this pillow case for the song "Smiles" aka "If You Chance to Meet a Frown...". I ordered one from Amazon and threw it on an old throw pillow and voila! The nursery kids adore it!!

Sing The Rainbow (Skittles)
I saw a lot of people posting different variations of this online. Here's my version.
I introduced it by mentioning St. Patrick's Day and symbols of that holiday, including the rainbow (put up pot of gold and rainbow picture) and told them that we were going to "Sing the Rainbow" today (put up Super Singing Skittles sign and SKITTLES acronym picture) and read the acronym. As I put up the colored Skittle pieces, I explained that there was a song on the back of each one. Then the other leaders passed out a container (disposable condiments containers) to each child and teacher. Each container had in it one of each colored Skittle to make the colors of the rainbow. (To make these you have to purchase both the original and wild berry flavored Skittles.) I explained the rules of the Skittle containers: They could only open them when I told them to, only eat them when I told them to, could not shake them or they would be taken away. I then gave them permission to open the container and pull out one Skittle and hold it, then I started choosing children. For this particular activity, I wrote the names of each Primary child on a colored popsicle stick (so we had all the colors of the rainbow). I put them all in a can (there was a Jr. and Sr.) and drew from there. I called out the name of the child I drew and asked them what color they chose, that's the Skittle color we sang. Then the kids were allowed to quickly eat their one Skittle before we sang. With one group they all ate what they drew and it somehow worked out. With the other group they would put theirs back and eat the color chosen. We kept going until all the songs were sung. Yummy fun!

Songs for each color:
Red - Gethsemane (he bled for us)
Orange - Did Jesus Really Live Again (sunrise)
Yellow - The Primary Colors (red, YELLOW, and blue)
Green - Give Said the Little Stream (..."the grass grows greener still"...)
Blue - My Heavenly Father Loves Me (..."or look at the blue, blue sky"...)
Purple - Little Purple Pansies
Food Rhythms
Someone somewhere posted this great guide that uses food to teach rhythms, I don't know where it originated from, but I love it!

I was thinking that sometime this summer I will pull it out to have a "Rhythm Picnic". I think I will put down a checkered tablecloth and a small basket or make a basket poster that I can make a slit in and reach into. Something like this:

Inside the basket, whether real or paper, will be these fruits (cut apart from the chart) to draw out and practice their rhythm. I think the kids will enjoy doing something different.
Farewell, Adios, See Ya Later Alligator
I copied this picture to eventually make my own poster which I haven't yet. I don't know where I borrowed it from and the only post I could find on FB, where I get a lot of my ideas lately, credits someone named Amber Nielsen with the idea but I couldn't find her original post. So this may be her picture, may not. It's sung to the tune of "Hello Song" CS 260


Valentine's Songs
I'm used something that a previous music leader made. The small hearts all fit in the large heart pocket to be drawn. On the back of each heart is a song about love. On one she had a corny valentine joke, I decided to take it further and put one on the back of each one to read before we sing! 😄
Another variation is the laminated bookmark things. You have the kids and/or teachers, leaders fill it out with their name and their favorite Primary song, put them in the heart and draw from them what to sing. 😊


Another variation is the laminated bookmark things. You have the kids and/or teachers, leaders fill it out with their name and their favorite Primary song, put them in the heart and draw from them what to sing. 😊


Mr. Potato Head
For one Sunday, the lesson was "I Have Been Sent To Earth To Gain a Body and Be Tested". I decided to do the Mr. Potato Head idea that I've seen on here and sing songs about the body. There is a song on the back of each piece (or set like ears, arms etc.).

Eyes - "Two Little Eyes"
Ears - "I Have Two Ears"
Mouth - "If You Chance To Meet a Frown"
Nose - "Head, Shoulders, Knees and Toes" (last word 😉)
Hands - "I Have Two Little Hands"
Feet - "Two Happy Feet" or "If You're Happy and You Know it"
Body - "Hinges" or "Do As I'm Doing".

Eyes - "Two Little Eyes"
Ears - "I Have Two Ears"
Mouth - "If You Chance To Meet a Frown"
Nose - "Head, Shoulders, Knees and Toes" (last word 😉)
Hands - "I Have Two Little Hands"
Feet - "Two Happy Feet" or "If You're Happy and You Know it"
Body - "Hinges" or "Do As I'm Doing".
Scrolling "TV"
I have seen this idea many times and I have never made one, but a previous Primary music leader did and I used it and the kids loved it! I took a picture of the outside and inside and I'll let you figure out how to put it together! Lol!! You can swap out songs by just untaping the ends that are taped to the pvc pipe. Each new song just has to be taped together in order on both sides so that it doesn't catch. The pencil nubs keep the handles from sliding into the box.


Do You Wanna Build A Snowman?
My singing partner today likes warm hugs! 😄I needed to drill the Spanish verse that we learned for I Am A Child of God so I printed and laminated pieces of Olaf and then put magnet tape on the back of each piece. As they sang each time through (sections at first and then the whole verse) a member of the Presidency watched the children and chose someone who was paying attention and singing well to come pick a piece of him out of a ziplock baggie and put it on the chalkboard. They were very attentive and sounded great! I was so pleased! "Do You Want To Build A Snowman" for the win!! ☃️
 You could also put the numbers of different songs on the back of each piece.

UNO Review
Last fall when I was trying to find a fun way to review all our songs for the program, I ran across this UNO Review idea. Several people posted it so I don't know who actually came up with the idea (but it was not me).
I originally used it for our program songs review and it worked out perfectly as we had eight songs and the kids loved it! I used a file that Whitney Bennett posted on Facebook:
 Here are her directions for getting it printed:
"I just put this together in Photoshop and wanted to share it with you all in case anyone was wanting it. I am printing it as a 20x30 at Costco for $8.99, laminating it, and mounting it to foam board (for long lasting durability). If you are interested in printing this off and using it, please download the high-resolution print file in the following link (copy and paste): https://drive.google.com/file/d/0BzsbI9PhThK0X1NuNUVnaDc5N3M/view
Make sure you print it as a 20x30, otherwise it will NOT fit the print correctly and cropping will occur. Have fun everyone!
*PLEASE CLICK ON THE LINK AND CLICK THE DOWNLOAD ICON ON THE TOP OF THE WINDOW. IF YOU JUST SAVE THE ATTACHED FILE, IT WILL BE GRAINY WHEN PRINTED BECAUSE IT IS NOT THE HIGH-RESOLUTION GRAPHIC."
So I printed it, laminated it and made song titles in each of the four colors. I did two in each color and I would swap in a new one once the first one was sung.
Here are her directions for getting it printed:
"I just put this together in Photoshop and wanted to share it with you all in case anyone was wanting it. I am printing it as a 20x30 at Costco for $8.99, laminating it, and mounting it to foam board (for long lasting durability). If you are interested in printing this off and using it, please download the high-resolution print file in the following link (copy and paste): https://drive.google.com/file/d/0BzsbI9PhThK0X1NuNUVnaDc5N3M/view
Make sure you print it as a 20x30, otherwise it will NOT fit the print correctly and cropping will occur. Have fun everyone!
*PLEASE CLICK ON THE LINK AND CLICK THE DOWNLOAD ICON ON THE TOP OF THE WINDOW. IF YOU JUST SAVE THE ATTACHED FILE, IT WILL BE GRAINY WHEN PRINTED BECAUSE IT IS NOT THE HIGH-RESOLUTION GRAPHIC."
So I printed it, laminated it and made song titles in each of the four colors. I did two in each color and I would swap in a new one once the first one was sung.
 There are lots of ways to play. What I did was pull out of a deck of Uno cards one of each color of the skips, reverses, ones, twos and all the wilds. I would choose a child to come up and choose a card. The color on the card told us which song we were going to sing (on wilds they would pick a color) and the symbol would give further details. On "skips" I think we had them skip while they sang. You can also have them skip certain words. On "reverses" they had to turn around and sing to the back wall. This really helped me see how well they knew their songs! 1 or 2 was the first or second verse or one or two times depending on the song and how many verses it had (none of them had more than two). Again on "wilds", they got to choose. As I said, it was a big hit!
Then in January of this year, someone suggested using it for reviewing the four verses of I Am A Child Of God. It worked pretty well. I ended up using these exact printouts for my verses, however, this is someone else's picture of theirs. I did end up pasting over a church produced picture of the Savior for the third verse.
There are lots of ways to play. What I did was pull out of a deck of Uno cards one of each color of the skips, reverses, ones, twos and all the wilds. I would choose a child to come up and choose a card. The color on the card told us which song we were going to sing (on wilds they would pick a color) and the symbol would give further details. On "skips" I think we had them skip while they sang. You can also have them skip certain words. On "reverses" they had to turn around and sing to the back wall. This really helped me see how well they knew their songs! 1 or 2 was the first or second verse or one or two times depending on the song and how many verses it had (none of them had more than two). Again on "wilds", they got to choose. As I said, it was a big hit!
Then in January of this year, someone suggested using it for reviewing the four verses of I Am A Child Of God. It worked pretty well. I ended up using these exact printouts for my verses, however, this is someone else's picture of theirs. I did end up pasting over a church produced picture of the Savior for the third verse.
 I have seen several people post that they also used Uno for teaching a song, although I have not tried that yet!


New Year Countdown!
This year we had New Year's Eve on Sunday so I really wanted to do a countdown of some kind. I first found this idea which looked really fun:
 However I didn't feel good about having the noise of popping balloons as we have a child in our Primary very sensitive to loud noises. So when I found this one posted on Facebook by Jessie Guzman Lawson,
....
However I didn't feel good about having the noise of popping balloons as we have a child in our Primary very sensitive to loud noises. So when I found this one posted on Facebook by Jessie Guzman Lawson,
....
 I knew that I had to make one! I polled many of our Primary families during the week to get their "Top Ten" favorite Primary songs. I then chose the top twelve responses and typed them up placing them along with some foil confetti in the plastic cups that I hot glued onto the foam board in the shape of a clock. I put them in order of favorites (12 least, 1 most) then covered each cup with a sequential numbered square of tissue paper held on with a rubber band. I would choose a child to come up and "punch out" a number, out would come the song and the confetti, and we'd sing the song. It was a big hit!!


 Little tip: The Jr. Primary were first and so vigorous with their punching that we lost a couple of cups. I had to tape them on for Sr. Primary and asked them to poke the cup with their finger instead!


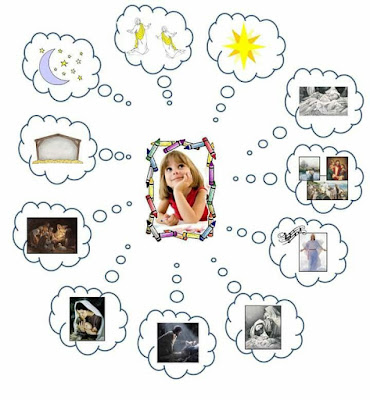
Picture A Christmas
I love this idea by Julie Hawkins! (I saw it on Facebook) I would like to make them large (each picture 8 1/2 x 11) so they can see them really well. These are her instructions:
Picture a Christmas: I first asked the children what picture came to their mind when I said the word “Christmas.”
The answers included Christmas tree, Santa, gifts, baby Jesus love etc. I then told them I wanted to create a beautiful
Christmas picture in our minds and then put up the middle picture. We put the first bubbled picture up and sang that
line. We then added the second and learned it and then added it to the first. We then added the third and learned it and
then sang it with the first and second etc. After all the pictures were up, we started taking them down and I had the kids
sing the pictures we took down without me. My juniors learned this song in one week! I have a magnetic white board in
my primary room so I bought a roll of adhesive magnet strip and put magnets on the back of all my pictures. This made it so easy putting pictures up and taking them down quickly. I'm hoping to get this ready for this Christmas.

Subscribe to:
Comments (Atom)